Best Overall
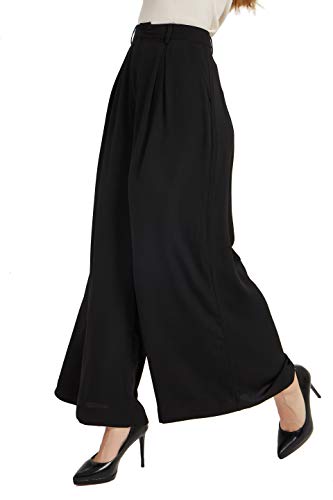
Tronjori High-waist business palazzo pants
A business-palazzo example to compare against the intended altered shape.
No exact leg-circumference or alteration feasibility evidence.
View on AmazonAlterations
You may like the waist and fabric of a pair of palazzo pants while wanting less sweep around the lower leg. Narrowing can sometimes make that pair more useful. It can also remove the quality that made the trousers hang well in the first place.
The decision is a small redesign, not simply a matter of sewing a line closer to the knee. Before cutting, define how much width you want to lose, where the new shape should begin, and whether the existing seams and fabric can support the change.
As an Amazon Associate I earn from qualifying purchases. Purchases take place on Amazon.
Best Overall
A business-palazzo example to compare against the intended altered shape.
No exact leg-circumference or alteration feasibility evidence.
View on AmazonBest Budget

Lower-priced adjacent option whose title explicitly includes straight-leg language.
Do not assume identical drape or narrower measurements without checking.
View on AmazonBest Premium
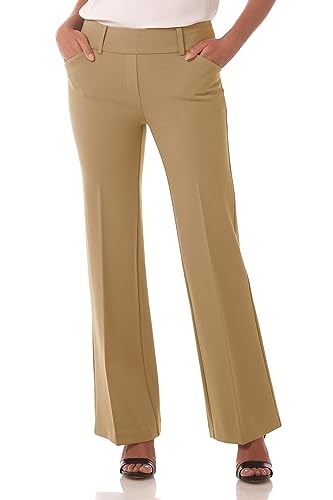
Higher-priced stretch office wide-leg alternative to a major redesign.
A price-tier comparison, not a tested superiority claim.
View on AmazonThese are editorial shopping starting points based on listed details, not hands-on tests. Budget and Premium describe relative asking-price tiers among the featured options when researched; they do not establish product quality. Confirm the selected size, composition and current price on Amazon. How we choose examples.
“Less wide” can mean several things. You might want the same flowing shape with slightly less circumference, a straighter leg below the hip, or a tapered ankle. Those goals require different seam lines. Take a photograph of the original pair and sketch the intended outline so you can explain the change to a tailor or evaluate your own basting.
Compare the desired shape with trousers you already enjoy, but do not trace one garment onto another without considering rise, fabric, and construction. A fitted stretch trouser is not a sound template for narrowing a nonstretch palazzo. If the new design would be close through the thigh and narrow at the ankle, acknowledge that you are leaving the original palazzo silhouette. The shape comparison guide can help describe the result without confusing the alteration with a simple size correction.
Check the waist, hips, seat, and crotch before evaluating excess in the leg. If those areas are uncomfortable, narrowing will not fix them and may make movement more restrictive. Keep the waistband at its intended position during the assessment. Do not pull the pants up to create a neater leg and then mark that temporary shape.
For a lower-leg adjustment, preserve the successful upper fit and start the proposed change below the area that needs room. Where that transition belongs depends on the actual garment. There is no universal rule to begin at the knee or a fixed distance beneath the hip. Sit and take a generous step with the original pair so you understand its working space. The fit guide is the place to resolve upper-fit issues before redesigning the leg.
The grain is the direction of the fabric's structure and how the pattern was placed on it. Sewing a different seam does not physically rotate those threads, but removing width unevenly can shift the relationship between the leg's shape, its grain, and where the seams hang. The result may twist or pull even if the measured hem looks symmetrical when flat.
Megan Nielsen's wide-leg Harper variation uses the grainline as a reference while developing leg length and width. That pattern example shows why shape changes need a consistent reference; it is not a ready-made alteration formula. On finished pants, identify the original side and inseam positions and any crease before marking. If you cannot tell whether the fabric was cut straight, on bias, or intentionally asymmetrically, a tailor can assess the original balance.Turn the trousers inside out. A simple plain seam is different from a French seam, flat-felled seam, piped seam, or heavily topstitched detail. Some can be opened and resewn relatively straightforwardly; others involve visible reconstruction. Find the pocket bags, lining attachments, side slits, and any trim crossing the proposed path.
Do not assume the side seam is the best location because it is easiest to reach. A pocket may occupy its upper portion, while the inseam may need to preserve the crotch transition. Taking everything from one side can move a crease or print placement. Some very wide designs use panels or unusual seam placement that make a conventional taper inappropriate. Photograph these features and decide whether you want to preserve them before paying for or beginning the work.
| Existing construction | Likely assessment | Question to resolve |
|---|---|---|
| Unlined woven with plain accessible seams | Potentially suitable for modest narrowing | Can the new line blend smoothly while retaining movement? |
| Stretch knit with specialized seams | Possible with compatible stitching and handling | Will the seam stretch and the fabric remain flat? |
| Independent lining | Requires coordinated outer and inner changes | Will both layers still move freely? |
| Permanent pleats or plissé | More complicated redesign | Can pleat arrangement and pressing be preserved? |
| Border print, piping, or decorative panels | Visible design compromise possible | Which detail would be cut, shifted, or interrupted? |
A favorable row does not guarantee success. It identifies what to inspect next. Fabric delicacy, seam allowance, and the amount of change can still make professional work preferable.
A leg circumference is formed by the front and back panels together. If you move a seam inward, fabric is removed from both adjoining edges. Measure the total proposed reduction rather than treating a marked distance on one folded edge as the whole change. Record the amount at several levels, such as lower thigh, knee, and hem, so the transition is visible.
For illustration, a one-quarter-inch inward shift on both front and back at each of two seams removes one inch around that leg. That is only arithmetic, not a recommended amount or distribution. Front and back panels need not have equal widths. Megan Nielsen's tapered Harper example treats their proportions separately and discusses testing the opening and movement. Its measurements belong to that project, so use them as context rather than copying them onto your trousers.
Mark the new seam lines with a removable method tested on the fabric. Blend the change smoothly into the original line and compare the corresponding points on both legs. Open the hem where necessary so it does not force the lower edge into the old shape. Keep the original fabric available while evaluating the alteration.
Use temporary stitching to test the new line. Pins alone can distort a broad leg, and wearing a garment full of exposed sharp points is an unreliable fitting method. Basting gives a more realistic view. If the old seam prevents the fabric from settling, unpick only what the planned fitting needs and retain the allowances. Do not trim simply because the excess inside feels bulky during the trial. That temporary bulk is preferable to discovering too late that you need the original width back.
Try the basted pants with the intended shoes. Walk, climb a normal step, sit, and bend. Check whether the lower leg catches on your calf, heel, or shoe, and whether the new opening passes comfortably over your foot when dressing. A narrower nonstretch hem can become difficult to put on even if it looks roomy around the ankle.
Look at the side seams while standing naturally. If they spiral, if diagonal tension appears, or if one leg seems to swing differently, reassess the alteration line. Compare the back view too. The new shape should not pull the crotch downward or make the upper thigh bind. If the change only looks successful in a stationary photograph, restore some width. The useful outcome is a pair you can wear normally, not merely a narrower measurement.
Narrowing changes the circumference that the hem must follow. A previously turned allowance may no longer fit smoothly when folded upward, especially on a tapered line. Preserve enough fabric to shape and finish it appropriately after the new seams are approved. Do not force the old hem into a smaller opening with extra pressing or overlapping folds.
Check the length again because a changed silhouette can alter how fabric rests over the shoe. Any lining must be assessed independently and kept from pulling on the outer leg. Finish the permanent seams with a method suited to the fabric, then complete the hem using the sewn-hem guide. Remove old stitches and marks carefully. A visible former seam line or a change in the fabric's surface may remain, so consider that possibility before choosing the alteration.
The Urban CoCo listing that includes both wide-leg and straight-leg language is a useful adjacent reference if your goal is a quieter outline. The Tronjori high-waist business-palazzo listing provides another named style to investigate, but neither title establishes exact leg circumference. Ask for selected garment measurements rather than deciding from the category alone.
For a higher-priced adjacent alternative, the Rekucci pull-on stretch wide-leg office pant may be worth comparing with your desired use. These ready-made examples are optional, not supplies for the alteration. Add the likely alteration cost and any lost details to your decision. A modest reduction on a well-fitting favorite can be sensible; rebuilding a dramatically different leg on an uncertain upper fit may consume more effort than starting with the correct silhouette.
Sometimes a limited inseam change is appropriate, but it is not a universal method. Consider the crotch transition, grain balance, front/back proportions, and where the seams should hang.
A modest reduction may retain a flowing silhouette. A substantial conversion to straight or tapered legs changes the design. The label matters less than whether the new shape is intentional and comfortable.
Set an approximate intended length first, but finalize the sewn hem after the leg alteration is approved. The changed circumference can require a different allowance shape and finish.
Narrowing is most promising when the upper fit is already successful and the change is modest. Define the desired shape, inspect the seams and fabric direction, and account for the full circumference reduction. Keep both front and back proportions in view rather than removing an arbitrary amount from the easiest seam. A basted movement test should come before trimming, with special attention to foot entry, calf room, and seam twisting. Rework the hem and any lining only after the leg behaves well. If the project requires major reconstruction or sacrifices distinctive details, compare it with a ready-made cut closer to your intended result.